
With Configuration profiles in Intune (or whatever Microsoft calls it these days), you can create an ‘Administrative Templates’ profile. Administrative Template profiles allows you to apply standard Windows and Microsoft Office group policy settings on Intune clients.
But what happens if you want to use ADMX that is provided for other companies? Unfortunately, at the time of writing, you cannot import 3rd party ADMX files into an Administrative Template profile.
However, hope is not lost! You can use the ‘Custom’ configuration profile in Intune to import (‘Ingest’) 3rd party ADMX files. Unfortunately, it’s not as easy as it could and should be. In this post I will explain how to use ‘Custom’ configuration profile in Intune to apply 3rd party group policy settings.
The example I use in this post is to import the Google Chrome settings. Google already has published steps on how to import their ADMX files into Intune using a ‘Custom’ configuration profile, however they are not as detailed as I think they should be.
You should be able to use the steps below for any 3rd party ADMX policy file.
Requirements
Unfortunately, before I begin, I need to go over some things! You need to know the following:
- When you set a Group Policy setting, Windows modifies registry keys
- Group Policy registry keys are usually located/created in the following locations in either the HKEY_CURRENT_USER or HKEY_LOCAL_MACHINE hives:
- (hive)\Software\Policies
- (hive)\Software\Microsoft\Windows\CurrentVersion\Policies
- ADMX files are XML files specify what registry keys/values need to be created/modified to apply a setting.
- When setting a Group Policy setting using a ‘Custom’ configuration profile, you have to use ‘OMA-URIs’. Unfortunately, these URIs do not map nicely to Group Policy settings in the ADMX file. This is explained under the Confirm ADMX Ingestion heading.
You should also have a nice text editor before you begin these steps as you will need to open the ADMX files in several steps.
Ingest the ADMX file
- Logon to Intune and navigate to Configuration profiles
- Click + Create Profile
- From the slide out Create a profile blade, select and create the following:
- Platform: Windows 10 and later
- Profile: Custom
- This should open the steps to create a Custom Profile
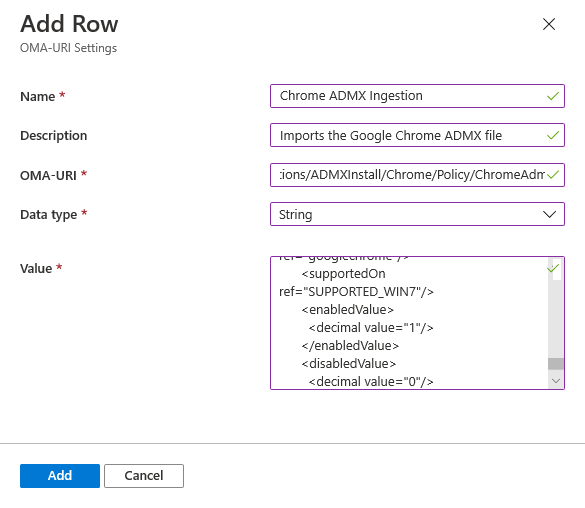
- In the Basics step, provide a name and a useful description, we tend to use a naming convention when we create Intune Configuration profiles. You should to!
- In the Configuration settings step, beside OMA-URI Settings, click Add. This is where you will configure this profile with the custom ADMX file.
- From the slide out Add Row blade that, configure the following settings:
- Name: <product> ADMX Ingestion (e.g. ‘Chome ADMX Ingestion’)
- OMA-URI:
- This is a key setting, and MUST CONTAIN the following:
./Device/Vendor/MSFT/Policy/ConfigOperations/ADMXInstall/
- You can add whatever path you want after the above path, but try to make it sensible
- I tend to follow how Google ingests their Chrome settings with a path similar to <product>/Policy/<product>Admx
- Using Chome as the example, the full OMA-URI path would be:
./Device/Vendor/MSFT/Policy/ConfigOperations/ADMXInstall/Chrome/Policy/ChromeAdmx
- The path that you choose here will determine how the ADMX file appears in the registry in later steps, and the OMA-URI paths
- This is a key setting, and MUST CONTAIN the following:
- Data type: String
- Value: Open the ADMX file and copy the contents of the file into this field.
- In the end, your add row should look similar to the following:
Adding a custom OMA-URI row
- Once you have added the row, you can continue through the rest of the create profile steps. Setting the required scope and assignments. I would suggest that you apply the this profile to a select of test devices first.
- Now it’s time to see if the ingestion worked! Remember: Intune Clients can be a bit slow to apply new settings.
Confirm ADMX Ingestion
This step requires you to be on a Windows machine that has been targeted by the new ‘Custom’ configuration profile you created earlier.
- Within Intune, confirm that the Profile assignment status on the client machine you are about to use is marked as ‘Succeeded’
- On the Intune Client machine, open regedit, and navigate to this key
Computer\HKEY_LOCAL_MACHINE\SOFTWARE\Microsoft\PolicyManager
- If the client has ingested the ADMX settings, you should see the following registry paths:
- The entire ADMX file will be ingested and the XML structure will be turned into registry keys in the following location:
HKLM\SOFTWARE\Microsoft\PolicyManager\AdmxDefault\2B99FF00-3519-4B26-A7FB-D74E053C3C78
Note: If you have ingested multiple ADMX files, settings for all files will appear here
- You will also see keys in the following location that relate to the ingestion of the ADMX file:
HKLM\SOFTWARE\Microsoft\PolicyManager\AdmxInstalled\2B99FF00-3519-4B26-A7FB-D74E053C3C78\<product>\Policy\<product>Admx
Note: The path shown above should match the OMA-URI path you setup in the Ingest the ADMX file steps.
- The entire ADMX file will be ingested and the XML structure will be turned into registry keys in the following location:
- In regedit, have a look through the sub-keys in the following location. The exact path of these subkeys are required when you want to manage the group policy settings contained in the ADMX file
HKLM\SOFTWARE\Microsoft\PolicyManager\AdmxDefault\2B99FF00-3519-4B26-A7FB-D74E053C3C78
- The policies should have subkeys that have names that match policies defined within the ADMX file
- In the example below, you can see what it looks like when the chrome.admx file is ingested into the registry:
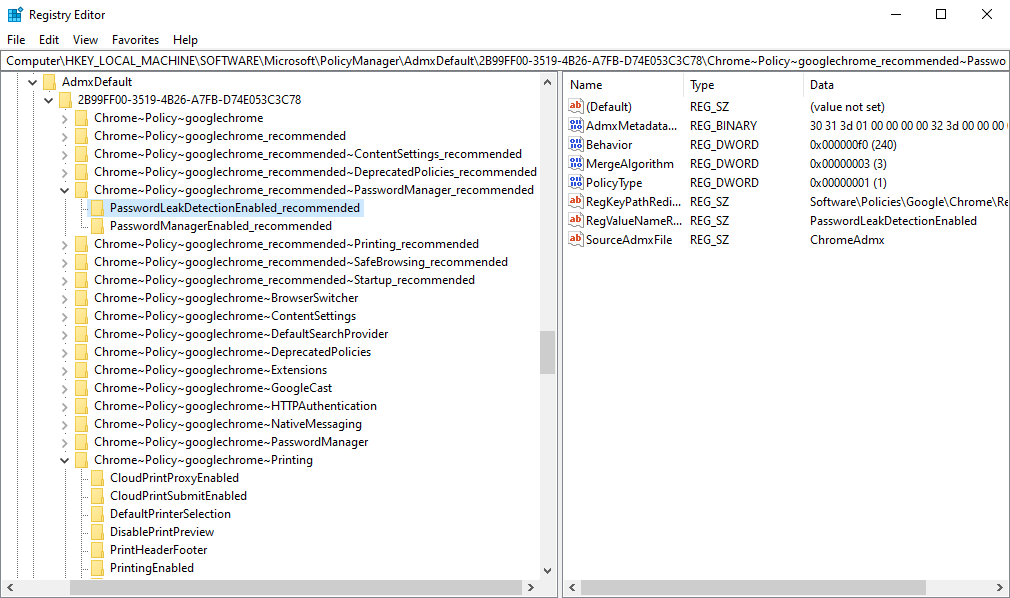
- If I want to set the highlighted setting via OMA-URI path I will need to remember the following path:
Chrome~Policy~googlechrome_recommended~PasswordManager_recommended/PasswordManagerEnabled_recommended
- In the example above I have highlighted ‘PasswordManagerEnabled’, I can now open the chrome.admx file to find that policy definition:

- Note that, in the chrome.admx file it states that in order to configure the ‘PassowordManagerEnabled’ setting, it will:
- Use the key:
Software\Policies\Google\Chrome\Recommended
- Use the value:
ApplicationLocaleValue
- Use the key:
- You will need to take note of these registry locations to confirm that the policy has applied in later steps.
Apply ADMX Settings
Now it is time to apply what has been learnt in the previous steps:
- Open Intune and on the Custom Profile you made earlier, edit the Configuration settings
-
Beside OMA-URI Settings, click Add
-
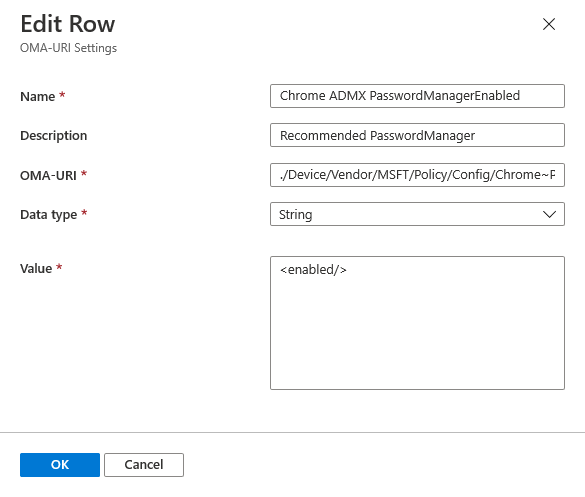
From the slide out Add Row blade that, configure the following settings:
- Name: <product> ADMX <setting> (e.g. ‘Chome ADMX PasswordManagerEnabled’)
- OMA-URI:
- This is a key setting, and MUST CONTAIN the following:
./Device/Vendor/MSFT/Policy/Config/
- The path after the above MUST MATCH the registry path you discovered earlier (e.g.)
Chrome~Policy~googlechrome_recommended~PasswordManager_recommended/PasswordManagerEnabled_recommended
- Putting it altogether, the full OMA-URI path would be:
./Device/Vendor/MSFT/Policy/Config/Chrome~Policy~googlechrome_recommended~PasswordManager_recommended/PasswordManagerEnabled_recommended
- This is a key setting, and MUST CONTAIN the following:
- Data type: String
- Value: This difficult to determine exactly what you need to put in here to configure the setting correctly. Some examples include:
- If it’s a boolean that is either enabled or disabled the string can be:
<enabled/>
- If it’s a setting that you have to populate with a string, then you need to create a data id/value pair. The id needs to equal the name of the policy and the value needs to be the string you want to use. e.g.
<enabled/><data id="ApplicationLocaleValue" value="en"/>
- If it’s a boolean that is either enabled or disabled the string can be:
- In the end, your add row should look similar to the following:
- Save your configuration profile. Now it is time to check if your settings have applied!
Confirm ADMX Settings
Logon to the Windows machine that has been targeted by the ‘Custom’ configuration profile.
- Within Intune, confirm that the Profile assignment status on the client machine you are about to use is marked as ‘Succeeded’
- On the Intune Client machine, open regedit, and navigate to this key/value of the policy found in the admx file, in our example it should be:
- Key:
Software\Policies\Google\Chrome\Recommended - Value:
ApplicationLocaleValue
- Key:
- If you have been successful, the registry key should now be there!

Hopefully this has given an overview of how you can add any ADMX into Intune, and (by looking into the registry), discover the OMA-URI you need to use to configure whatever setting you want to set.
Using this method (say over using a script), is really powerful because Intune will report via Profile assignment status if the registry keys are being created or not.
It’s an annoying thing to setup though, and if you have any questions feel free to ask them in the comments!
Some Additional Notes
- If you are getting a -2016281112 (Remediation failed) / 0x87d1fde8 error, it could be either:
- the OMA-URI is incorrect
- you are trying to import Microsoft policies (it looks like Intune client blocks the ingestion of ADMX files that write keys into Software\Policies\Microsoft)

